Integrating Google Tag Manager can be a game-changer, offering numerous advantages and empowering users to gain valuable insights into their campaigns. In this article, we'll delve into the benefits of this integration and provide guidance on how to set it up effectively.
Advantages of Google Tag Manager Integration
1. Streamlined Tracking
Google Tag Manager integration allows for the centralized management of all tracking tags, streamlining the process of tracking user interactions and events on your website. Rather than manually inserting individual tags into your site's code, you can use GTM to deploy, modify, and deactivate tags with ease. This simplification saves time and minimizes the risk of errors, ensuring your tracking is always accurate.
2. Enhanced Data Accuracy
When tags are integrated through Google Tag Manager, you gain access to GTM's built-in debugging and error-checking tools. This means you can identify and rectify any tracking issues swiftly, preserving the integrity of your data. With Marketing Center integration, you'll be better equipped to make data-driven decisions that contribute to the success of your marketing campaigns.
3. Flexibility and Customization
GTM integration into Marketing Center allows you to customize tracking parameters based on your specific needs. You can tailor tags to track various user interactions, such as form submissions, video views, or button clicks, enabling you to gather precise insights into user behavior. This flexibility ensures that you capture the data that matters most to your business.
4. Improved Performance
By utilizing Google Tag Manager's asynchronous tag loading, your website's performance is optimized. Tags loaded asynchronously won't block the loading of the rest of your website, resulting in faster page load times. This is critical for user experience and can positively impact your website's search engine rankings.
Setting Up the Marketisng Center Google Tag Manager Integration
To unlock these advantages, you'll need to set up the integration between Marketing Center and Google Tag Manager. Here's a step-by-step guide:
Step 1: Create a Google Tag Manager Account
If you don't already have a Google Tag Manager account, sign up for one at tagmanager.google.com. Follow the on-screen instructions to set up your account.
Step 2: Configure Google Tag Manager
Once your account is set up, create a new container for your website within GTM. This container will hold all the tags for your site.
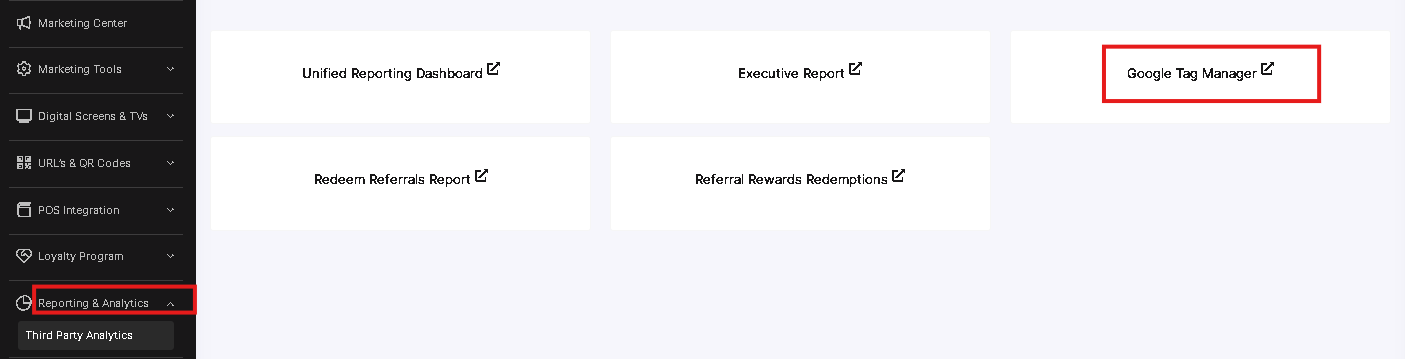 At the Admin Panel press on Reporting & Analitycs and then open Google Tag Manager.
Please allow pop-ups on this site to enable pages to be displayed and open products.
Step 3: Install Google Tag Manager Code
To integrate Google Tag Manager with Marketing Center, you'll need to install the GTM code on your website. There are two parts to the GTM code: one that goes in the <head> section of your website and one that goes in the <body> section. Here's an example of how the code should be inserted:
<head>
  <!-- Google Tag Manager (head) -->
  <script>(function(w,d,s,l,i){w[l]=w[l]||[];w[l].push({'gtm.start':
  new Date().getTime(),event:'gtm.js'});var f=d.getElementsByTagName(s)[0],
  j=d.createElement(s),dl=l!='dataLayer'?'&l='+l:'';j.async=true;j.src=
  'https://www.googletagmanager.com/gtm.js?id='+i+dl;f.parentNode.insertBefore(j,f);
  })(window,document,'script','dataLayer','GTM-XXXXXXXXX');</script>
  <!-- End Google Tag Manager (head) -->
</head>
<body>
  <!-- Google Tag Manager (body) -->
  <noscript><iframe src="https://www.googletagmanager.com/ns.html?id=GTM-XXXXXXXXX"
  height="0" width="0" style="display:none;visibility:hidden"></iframe></noscript>
  <!-- End Google Tag Manager (body) -->
  <!-- Your website content goes here -->
</body>
Replace 'GTM-XXXXXXXXX' with your actual Google Tag Manager container ID.
Step 4: Configure Marketing Center Tags
Inside your GTM container, configure the Marketing Center tags to track the specific user interactions and events you're interested in. This can include tracking form submissions, clicks on specific buttons, or engagement with particular website elements.
Step 5: Publish and Test
After configuring your tags, be sure to publish your changes within Google Tag Manager. Test the tags to ensure they are working correctly and capturing the desired data.
Integrating Google Tag Manager empowers businesses to efficiently manage tracking tags, maintain data accuracy, customize tracking parameters, and improve website performance. By following the steps outlined in this guide, you can set up this integration and harness its full potential to gain valuable insights into your marketing campaigns. With the GTM integration in place, you'll be well-equipped to make data-driven decisions that drive the success of your online initiativesю